Object Tutorial
Version 1.1
Made by John Verheijen (jw.verheijen@hetnet.nl)
and Graham O Donovan (sodon@iol.ie)
In this tutorial the object that I use is the crane and the
track is Interlagos.
Contents
A. Input Objects
B. Turning Objects and changing heights
C. Import/Export
D. New Object Definition
E. Object Texture Editing
- Input Objects
First
you must select the track selection button.
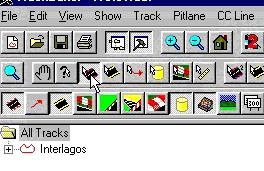
If you want to put in a new object click once with
you’re left mouse button on the track section where
you want an object. Next click with your right button on
the same track section and you will see the following.

Click on Insert Track Object then you see the Object
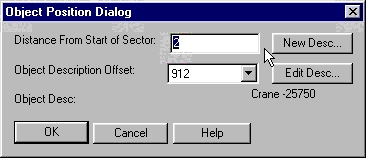
Position Dialog.
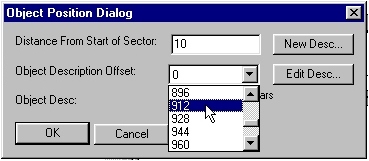
Now we choose 912 in the Object Description Offset,
then we must choose where the object must be placed in
the track section. The track length in the example is 4,
so the value of Distance From Start of Sector must be
between 0 and 4.
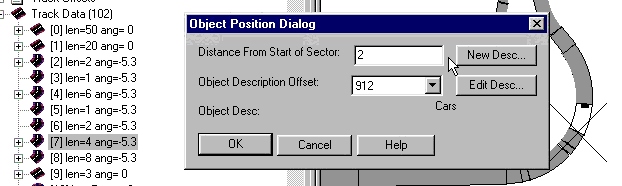
Click on OK and the Object is in the track.
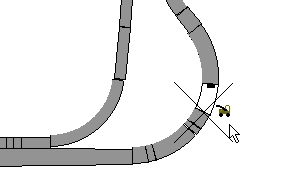
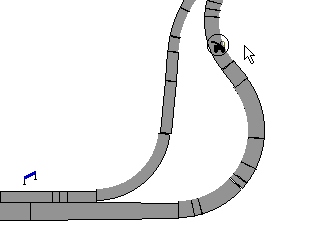
If you change the value in Distance From Start of
Sector further then the track length is and the object is
placed in a corner then the object follows the angle of
that corner. See the example below her is the value 18.
How do you find the code of the Object?
Click in the menu Tables/Object View and you see the
value of the crane I use.

You can’t place
two Objects at the same Distance From Start of Sector in
the same Track section!
Then only one Object
is placed in that track section.
The other Object you
can't see in the track.
- Turning Objects and
changing height
If you want to turn the
objects or change the heights, click on the Edit
Desc… button in the Object Position Dialog.
Then you get in the Track Object Definition Editor.
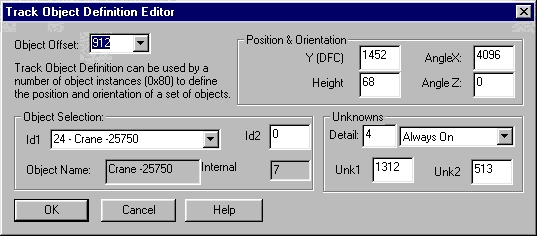
There you see:
Object Offset (with the value of the crane)
Position &
Orientation
Object Selection
Unknowns
Y(DFC): the distance
from the center of the track (- is on the left side of
the track)
AngleX: With the
AngleX you can turn the object.
16384 = 90 degrees
32768 = 180 degrees
49152 = 270 degrees
65536 = 360 degrees
You can give another
value between 0 and 65536, the object turns then between
0 and 360 degrees.
AngleZ: With the
AngleZ you can turn the object upside down if you want.
You can use the same
values as the AngleX
Height: With the
height you can change the height of the object. (I think
this will need no explanation)
If you change the
values all the objects with the same Object Offset will
be changed, if you want a another see D. New Object
Definition.
Object Selection:
ID1 is the ID of the object you will be using.
ID2 is sometimes
needed if you want to place trees or bushes, ID1 is then
most of the time 5,ID2 is then between 84 and 129.
Unknowns Detail:
This is connected with the alt+d keys.
There are different
values between 0 and 256. There are 4 values discovered.
4 detail always on
2 Detail level low
64 Detail level
Medium
100 Detail level
High
There are two
unknowns Unk1 and Unk2, for this moment we don't know
what they are doing.
- Import/Export
In
the TE 1.6.0. is it some times possible to import/export
objects. It's more "trial and error".
Maybe is this also possible in the TE 1.5.7. but I
don't check this.
First go to the Internal Object definition tree, click
with your right mouse button on the object you want to
export. Then give a name you will use for this object. Go
to the track you want to import the object, go to the
menu Object/Jams-Insert New Internal Object, go to the
directory where you put the object and select the object
you want to import. Then you will see in the Internal
Object Definition tree the new object. You will also
needed the Jam files that the object use. Paul say this
in the Track Editor Forum.
As for moving objects around... well it has been
dones, but I haven't tested completely this
functionality....... ok how do we do this right
objects are defined in the track as internal object (IO)
these can be exported into a text file by going to the
tree opening the Internal Object representation list
(transparent cylinder!) now select the object you want
to export now right click and select Export 3D Object.
now go to your new track and select Insert New Internal Object
select the saved object and it is imported press F5 to
update the tree and you should see this at the end of
your internal object list......
now this may or may not work properly because I have
to change quite a few offsets for this and I have
found that sometimes it goes wrong! so be sure to
SAVE YOUR FILE
the internal id that get added can now be used in
a Track Object Descripition!!!
Don't ask me about textures on the objects...
we'll cross that bridge when we come to it!
If that works, I'm a monkeys uncle!
Paul Hoad
- New Object Definition
If you succeed to export/import the object you can make a New
Object Definition. Go to the Object Position Dialog and click on
the New Desc.. button. Then you will see the following.

Normal the Object Ofsett will be automaticly, now put all the
values you want to use in the Track Object Definition Editor. The
ID1 you can choose as you see in the example above (Not available
in the TE 1.5.7.). Click on OK and the new Object will be in the
Object Definition tree.
In TE 1.5.7. you must go to the Object Position Dialog and
click on the New Desc… button.
This is what Paul said in the Track Editor Forum:
Now Track Object Desriptions can be made in
only one way and its abit hidden I'm afriad.
find an object on your track in the tree
double click on it...see the new Desc button
click it see the nice message box saying they
aren't saved...well.........I lied! :-)......
this generates a new object on the end press F5 youll
see it added it will probably say Cars... don't get
excited I haven't added a car to the circuit its
just the cars are the 0 internal object.....
I think you can edit this now and I check it does get
saved in the file.... I didn't check though wether it
destroys the track.. so make sure you SAVE everything!
its possible you could put the object info in here
but I can see why we can't alter an old one!
a couple of things adding objects and object descriptions
shifts the offsets around and one of the offsets is
a pointer to the starting lights......(probably
so gp2 can fiddle with which jam texture it uses
for the lights...) I do make the adjustments I need
but I suspect its not quite right....
close though..... I know what you are all thinking
we are pretty close to swapping objects between tracks
well look at Christians site he has done it already
and given me the correct codes but I obviously made a
mistake... I will need some time before I can fix
this, unless someone can say after reading the
explaination what I did wrong (not likely!)
Paul Hoad
E. Changing Object
Textures
A quick word
Before you start if this is you first attempt it might be
better if you went exactly along with me in this tutorial, the
track used was Brazil, Interlagos
Changing Oject Textures
A lot of you are having trouble with this but if you can
master it it will help you create much better tracks and not just
settle on a Graphic but have the exact one you need, there are
two ways to do this, I will explain the way I find easiest:-)
1. Obviously you open up your track,
2. Next look below, double click on the highlighted
"internal object definitions"

3. Next you will have a screen like this

You can choose any object you want but in this case I've selected
the Flyover highlighted above. To edit this you must double click
it.
4. Now this is your screen. 
You can now see that on the right where the track was we have a
table of all the data of that object, We are not concerned with
that for now as there is another way to edit that object. Again
double click on the word textures where highlighted
5. Now click once on a texture as shown, And then look at the
bottom box. 
We can see in the bit highlighted that the texture id
"240" is selected.
Now Change the value to another, in this case we'll choose
"180"
N.B. If you double click on the texture in the above menu it will
not save the texture so you must change it in the below menu.
Also after changing the id below you must press enter to make it
stay at that number.
6. Try to follow this bit,
First look at the picture below
a. Scroll down the page until you can see the word "texture
data" and double click it.
b. Now we know that the value we changed before was 240 before we
changed it so now we want to find that number.
Here that happens to be in number 6 so double click it and you
will see the word "Texture?=240" The 240 means you have
the right texture, so click once on it. 
c. This is what you will see in the bottom box, above we changed
this 240 to 180 so here we do the same.
Now just save your track, play the game and when you see that
object in your lap you can gaze in amazment at it:-)
It is very important that you change the value in both places and
then save it. Also the changed values may not appear in the
top-left menu until you press F5.
Choosing the right object
Chooseing the right object is simple, first on the track menu
double click on the object you want to edit. 
This is what you'll see
Look for ID1:
Here its 23.
Now in this screen look for id1=23 as the first piece of writing.
Easy eh?
This tutorial contained extreme acts of violance and should not
have been read by young Children. hehehehe:-)
If you find something hard to understand e-mail one of us and we
be more than happy to help you, Also email us if you find this
tutorial easy to understand and very informative to praise me and
let me know how great I am.
Only messin' but let me know what ya think.
John Verheijen and Graham O Donovan
Soon the Tutorial will be updated with Object Shape Editing.