GP2 3D Object Editing for Beginners
Version 1.0 25/06/07
Here is what I figured out when I started to edit GP2 3D Objects using Paul Hoad's ObjectEditor program.
The information has been gathered from a few different sources:
- The "Internal Object Structure" tutorial which is in the ObjectEditor Help File, by Paul Hoad.
- The "Object Tutorial" version 0.8 by Martijn Keizer.
- The "Car Shape Primer" version 2 by Paul Hoad.
This process should be read in conjunction with the "Export - Import 3D Object" tutorial version 1.1 by Andreas Schulz and Ralph Smith.
Index
- Introduction
-
- Points, Scales, Referring Points, Heights
-
- Lines, Planes, Textures
- Lines
Planes
Texture cmd Types
Texture Images
- What do we get to See?
-
- Problem Solutions
-
- Revisions
-
This tutorial will hopefully encourage or assist more people to edit 3 Dimensional (3D)objects for Microprose's Grand Prix Two, or as
it is commonly called GP2. 3D objects are stationary objects, such as buildings, signs and bridges that are placed beside or over tracks
and pitlanes created by GP2 enthusiasts.
The terms used here are those used in the GP2 ObjectEditor by Paul Hoad. Version 0.2.0.245 is the latest version and it is what is used
in this tutorial. With this tutorial you should have received objedit1.gpo, a 3D Object file, and objedit1.jam, a file of bitmaps to
apply to the 3D object.
In GP2 3D objects are defined by a number of points joined together by straight lines. When these lines are joined they form polygons of
at least three sides. Bitmaps are then applied to these polygons to make them appear as solid objects. In the ObjectEditor a 3D object is
defined by Points, Vertices and TextureData.
You can apply this tutorial to the objedit1.gpo object file, as supplied or get your own file, and we will turn the misshapen object
into a cube. GP2 3D object files (.gpo) are created by exporting an existing 3D object from an existing track, using Paul Hoad's
TrackEditor. The reason for editing the object is to create a new object for use in a new GP2 track file.
I suggest that you use a new filename every time you save the file. This is so that if something gets badly corrupted you can reopen
the previous file and not have to start from scratch. Believe me, it happens. I increment a counter in the file name to make it easy to
track file versions. eg. objedit1.gpo objedit2.gpo objedit3.gpo etc.
Warning. Do not use this tutorial as a guide to adding any points, verticies or textures to an object.
You WILL have many problems. I am working on an Advanced 3D Object Editing tutorial, which will cover this, but it does not have answers
to all of the problems you will encounter. Use this tutorial as a guide to modifying existing objects that have enough points,
verticies or textures to create the object that you want.
Points are defined by an X, a Y and a Z value relative to the anchor of the object (which has coordinates 0,0,0). The X and Y values
define the horizontal location of the point and the Z value defines the height of the point relative to the anchor point.
To explain this we will look at a cube. The imaginary anchor point is the centre of the lowest horizontal plane.
Looking at the base of our cube we see a square defined by points B, C, D and E, surrounding an anchor point A.
+X North +X
+Y B -------------- C -Y
| |
W | | E Positive X values are to the North or above the anchor point (A).
e | | a Negative X values are to the South or below the anchor point (A).
s | A | s Positive Y values are to the West or left of the anchor point (A).
t | | t Negative Y values are to the East or right of the anchor point (A).
| |
+Y E -------------- D -Y
-X South -X
If each side of our cube is 1200 units long, the X and Y values for the four points of this plane are defined by using combinations of
positive and negative 600. So to specify the base of our cube we want to apply the following values to achieve sides 1200 long.
1024 object units are exactly as long as one track length unit, which is in turn 16 real feet or 4.87 metres. That makes one object
unit equal to 4.75 millimetres, or 3/16th of an inch. So our 1200 units is 18.75 feet or 5.7 metres long.
600 600
600 B --------------- C -600
| |
| |
| |
| A |
| |
| |
| |
600 E --------------- D -600
-600 -600
In the ObjectEditor the points are designated as p[0] onwards. When a point is selected in the ObjectEditor Points list, the same point
is highlighted in red in the ObjectEditor 3D view. Our cube is thus defined by points p[0] to p[7].
The Z axis value is just a number. The X and Y axis however, work a little differently.
There are two ways of specifying X and Y values.
The Scale method specifies the X and Y values by referring to a predefined list of values called ScaleData. ScaleData is specified
for every value that you want to use to specify the X and Y values. To explain this we will look at our cube. As the sides are all 1200
long, the X and Y values for all of the points are defined by using combinations of positive and negative 600.
600 will be our first ScaleData value S[0]. 0 appears to always be the last Scale in the objects that I have examined. The Positive and
Negative references are the stored values that will be given to each points X and Y axis by the ObjectEditor and displayed in the ZCode
and YCode fields.
| ScaleData |
Units |
Positive reference |
Negative reference |
| S[0] |
600 |
4 |
132 |
| S[1] |
0 |
8 |
136 |
The Positive references start at 4 and each subsequent Scales Positive reference is incremented by 4. Similarly the Negative
references start at 132 are are incremented by 4 for each subsequent Scale.
Warning. If the existing object does not have enough scales, find another object that does have
enough scales. Alternatively you might like to refer to the Advanced 3D Object Editing tutorial for advice on how to add do this. It
is not as easy as it seems.
For example point C (p[0]) (600, -600) would be stored as X = scale 0 and Y = negative scale 0. ie. X = 4 and Y = 132.
In the ObjectEditor you select the appropriate value from the drop down menu and select the "-ve" check box if required.

The advantage of programming the objects like this, is that you can easily stretch an object in one direction, by adjusting the
"scale" value.
The second "Referring" method uses the same values as another point that has been previously defined. This method could be used
to define the top plane of our cube. So instead of specifying each point of the top plane with combinations of 600, we can specify their
X and Y values as being the same as a point on the bottom plane and specify a value for the Z height.
In our cube, the top plane point above point C, or p[0], can for example use the same X and Y values as p[0].
In the ObjectEditor you select the appropriate value from the X axis drop down menu. So for p[4] we select p[0] in this case and enter
600 for the Z height. As we are copying the p[0] X and Y values by making an X entry we do not need to make a Y entry.

The stored values for this method start at 32768, to copy p[0], and increment by one for each subsequent point. eg. Copy p[3] is stored
as 32771.
The advantage of this method is that any change in the lower plane is automatically reflected in the upper plane.
You may want to "de-couple" some points to change the appearance of the object. You can do this best in two steps: first, change
the X and Y values of point p[4] to the same scales as point p[0]. Then, you can make the changes to the object, without worrying that
changing point p[0]'s position will change point p[4]'s position as well.
Warning. If the existing object does not have enough points, find another object that does have
enough points. Alternatively you might like to refer to the Advanced 3D Object Editing tutorial for advice on how to add do this. It
is not as easy as it seems.
Enter the point data as follows to produce the points for our cube.
| Point |
X |
Y |
Z |
| 0 |
600 |
-600 |
0 |
| 1 |
600 |
600 |
0 |
| 2 |
-600 |
600 |
0 |
| 3 |
-600 |
-600 |
0 |
| 4 |
600 |
-600 |
600 |
| 5 |
600 |
600 |
600 |
| 6 |
-600 |
600 |
600 |
| 7 |
-600 |
-600 |
600 |
It should appear in the Points list like this.

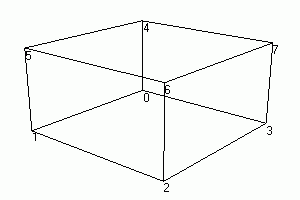
Our cube appears in the ObjectEditor as a series of dots. I have turned the point numbering on here. 0 to 3 are the lower plane, 4 to 7
the upper plane.

Lines
Now that we have defined the points, we have to make an object out of these. GP2 does that by making straight lines from one point to
another. In the ObjectEditor lines are called "Verticies". The definitions of these lines are in the "Verticies" list. When a Vertex
is selected in the ObjectEditor Verticies list, the same line is highlighted in red in the ObjectEditor 3D view.
We create a line, or Vertex, by specifying the points that it runs "From" and goes "To". You cannot use Vertex
v[1]. (Leave it as 0 to 0) Our first line v[2] goes from p[0] to p[1].

This is done for all of the lines, or each Vertex. It does not matter whether the line goes to a higher or lower numbered point. It is
however important to note which direction each line is going. More on this later.
To make this easier I make all of my lines go from a smaller number to a larger number.
Warning. If the existing object does not have enough verticies, refer to the Advanced 3D Object Editing
tutorial for advice on how to add do this. It is not as easy as it seems.
When all of the vertices have been defined, they should appear in the Verticies list something like this.

Here we see the completed cube, first with the point numbers displayed and then with the line numbers displayed.

The object can be rotated around the X and Y axis by dragging the mouse around in the 3D object view window. Holding the Ctrl key and
moving the mouse allows the object to be rotated about the Z axis.
These lines must now be combined into planes, or polygons, which are closed loops of lines running in one direction. The definitions
of these polygons are in the TextureData list. When a Texture is selected in the ObjectEditor TextureData list, the same plane is
highlighted in red in the ObjectEditor 3D view.
The plane definitions usually start with the base or lowest line and proceed around the object in the clockwise direction.
When images in the Jam files are applied to a polygon the base of the image is applied to the first vertex defined in the polygon.
Having said that I have seen them start with the right hand side of a rectangle and then proceed around the object in the clockwise
direction. (See the Estoril tent for an example.)
I told you to remember about vertex direction. This is where it comes in.
The front, or South, plane is defined by points 2, 3, 6 and 7. It is also defined by vertex's 4, 8, 12 and 13. We need to specify the
vertex numbers in a clockwise direction, as viewed from the outside of the object. ie. lines 4, 12, 8 and 13, but we need to know in
which direction they were defined.
To make this easier, as I mentioned earlier, I make all of my lines go from a smaller number to a larger number. I now turn on the
display of the line numbers and point numbers, in the 3D view, and know which way each line was created. It is a bit messy to look at,
but it works for me.
So lets look at how they were defined.
number = from point -> to point
4 = 2 -> 3
12 = 2 -> 6
8 = 6 -> 7
13 = 3 -> 7
This means that we have to reverse the direction of lines 4 and 13.
We do this by placing a minus sign before the line number.
-4 means 3 -> 2
-13 means 7 -> 3
The vertex list reads
-4 12 8 -13 which translates to
3 -> 2 -> 6 -> 7 -> 3
6-------->--------7
| |
| |
2--------<--------3
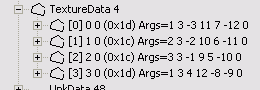
To enter these values into the ObjectEditor, expand the TextureData list and select texture[0]. Expand the texture to display its
attributes. Double click the first vertex attribute and enter the first value. When all values for that plane are entered, save the file
and close it. Reopen the file and select the texture[0]. You will probably see this if you entered the values correctly.

This is not what we were expecting!
Warning. ObjectEditor bug
In the ObjectEditor version 0.2.0.245 there is a bug.
If you enter the values we have worked out and enter them into the texture[0] vertex values, you will not select the plane that you
expect. Because of the bug we have to subtract 1 from each of the calculated verticies and enter -3 11 7 -12, into texture[0], instead
of -4 12 8 -13. Save the file and close it. Reopen the file and select the texture[0].
You should see this if you entered the new values.

We have now successfully defined a rectangular plane!
Repeat this for each plane that we want to apply a texture to. When all values for each plane are entered, save the file and close
it. Reopen the file and select each texture in turn to make sure that they all defined as you expected.
When all of the polygons have been defined, they should appear in the TextureData list something like this.
If the polygon is defined in an anti clockwise direction GP2 will backface cull it and remove the polygon from view if it thinks
its facing the wrong way!
This is why people sometimes edit the vertex list and then have problems with the polygons they were editing disappearing.
Warning. If the existing object does not have enough planes, refer to the Advanced 3D Object Editing
tutorial for advice on how to add do this. It is not as easy as it seems.
Texture cmds have various parameters depending upon the cmd type.
| Common Parameters |
|
|
|
Common Parameters |
| Cmd |
Texture |
Rotation |
Flags |
Horizontal/Vertical Repeat |
Horizontal/Vertical Repeat |
Vertex List |
Terminator |
| 10 |
|
|
|
|
|
3 - ? |
0 |
| 11 |
|
|
|
|
|
3 - ? |
0 |
| 18 |
|
|
yes |
yes |
yes |
3 - ? |
0 |
| 1c |
|
|
|
|
|
3 - ? |
0 |
| 1d |
|
|
|
|
|
3 - ? |
0 |
- Texture
- Pointer to image in Jam file
- Rotation
- Rotation of image apparently. I don't know how to use it. Anyone with a working example?
Some reports state that this variable can be modified to rotate images. I have not been able to get this to happen. I have been able
to mirror an image, but it was distorted which makes it unuseable in my opinion.
If your original object has a value of 3, you might like to try values between 0 and 127.
3   normal
96  mirror
112 mirror
127 mirror
131 rotate 90 degrees clockwise, but the polygon will be changed to another shape!!!!
If your original object has a value of 131, you might like to try the following values.
131 normal
192 normal
208 mirror
224 mirror
240 mirror
256 up side down
Further experimentation may reveal workable solutions. If you are going to experiment with this variable, please make sure that
you have a backup copy of the track before starting. If you find a workable solution please make it known.
- Flags
- I don't know what this is used for. Anyone?
- Horizontal/Vertical Repeat
- Used to repeat the image over a plane. A single pit garage image could be repeated horizontally 16
times, for example, to create a 16 garage pit building. (See the Estoril pit building for an example.)
The number of repeats is multiplied by 256. ie. 16 repeats = 4096 (16 x 256)
I have seen the vertical repeat used to repeat images that are on their sides in the Jam file, where the plane definition did not start
at the base or bottom of the plane. (See the Estoril tent for an example.)
I have always seen the Horizontal repeat listed before the Vertical repeat, but some objects only have a single repeat. (Sorry, but
I can't remember where.)
Repeats appear in cmd types other than 18, but I don't know what determines if they are there or not. Anyone?
- Vertex List
- List of verticies or lines. Varies from 3 to 7 via ObjectEditor menu, but I have seen 8 in use.
- Terminator
- End of the cmd. Always zero
My advice is to use the existing rotation and flag values as found in the object.
Now that we have defined the planes, we have to make the object appear as a real object instead of a wire frame shape. To do that we
need to apply a texture, or bitmap image, to each plane. The bitmaps are stored in JAM files. Some Jam files are common to all
tracks and some are specific to a particular track. The common Jam files are stored in the GP2\GAMEJAMS directory and the track specific
Jams are stored in a GP2\GAMEJAMS subdirectory named after the track.
eg. The Hockenheim Jams are stored in the GP2\GAMEJAMS\HOCJAMS directory.
Our tutorial Jam file is called objedit1.jam and should be stored in the GP2\GAMEJAMS\OBJEDIT directory. It has four images in it with
signs labeled North, East, South and West. Original eh. We will apply these images or textures to the objects four sides.
We need to change the objects existing jam file from gamejams\ardmore\ardtower.jam to gamejams\objedit\objedit1.jam. To do this we need
to close the ObjectEditor. Open gamejams\objedit\objedit1.jam with a plain text editor like Notepad. At the end of the file you will
find:
##JAM_TEXTURES 1
##JAM_FILE 0 0 gamejams\ardmore\ardtower.jam
Change it to:
##JAM_TEXTURES 1
##JAM_FILE 0 0 gamejams\objedit\objedit1.jam
Save the file with a new name and close the text editor.
Open the new file with the ObjectEditor.
The JamFiles list should now look like this.

If you do not have the jam file in the correct directory and the menu buttons Show Filled, BackFace Culling and Show textures are all
selected, the object will appear like this. Red and white squares are applied along with the words No Jam File.

The objedit1.jam file consists of four bitmaps contained in one file. From left they are numbered 3, 1, 2 and 4. The green background
is a special colour that is invisible in GP2 and appears to be transparent. I have placed names on the bitmaps to match the terminology I
have used in this tutorial. ie. North, South, East and West.

To assign each jam bitmap to the desired plane, enter the values 4, 1, 3 and 2 into the Texture variable of textures 0, 1, 2 and 3
in the TextureData list. When all four values have been entered, save the file and close it. Reopen the file and with the menu buttons
Show Filled and Show textures selected, you should see this if you entered the values correctly.


As this looks a bit distorted, we shall change the height of the object. Expand the Point list and double click Point[4]. Replace the
600 value in the Z field with 3200. Enter the same value into the Z field for point 5 to 7 and note what happens to the 3D object. When
all values for points 4 to 7 have been entered, you will probably see this if you entered the values correctly.

Save the file with a new name.
You can now import the object into your track and place it wherever you desire. Use the "Export - Import 3D Object" tutorial version
1.1 by Andreas Schulz and Ralph Smith for guidance on how to do this.
Before you do that, you need to edit the file with a text editor and change the name of the jam directory to somehow reflect the
track name. This makes it a lot easier to keep track of which jams belong to which track. My track is Ardmore in New Zealand, so I
used:
##JAM_TEXTURES 1
##JAM_FILE 0 0 gamejams\ardmore\ardtower.jam
You need to copy the jam file into the same gamejams subdirectory and use the matching file name or you will get the red and white
squares if you try and view the object with the TrackEditor. If they don't match the object will not be visible in a race.
back to index
When the object is installed beside the track, we see the following faces, assuming that the object is installed without any
rotation.
| Track Side |
First view |
Facing Track |
In Mirrors |
| Left |
East |
North |
West |
| Right |
East |
South |
West |


If the object is only on one side of the track, without any rotation, only three sides of the object are visible. This means that we
do not have to create solid objects. Many objects can just be shells without backs. Our tower, for example, could be created with only
three sides, if it was used on one side of the track only.
The Estoril pit garages were created like this.
This building and bridge in Monaco is not complete either.


After I define a plane, I don't see the polygon that I expect.
----------------------------------------------------------------------------------------------------------------------------
Because of a bug in the ObjectEditor, when defining a plane you need to subtract one from each of the displayed vertex numbers. |
|
| ---------------------------------------------------------------------------------------------------------------------------- |
---------------------------------------------------------------------------------------------------------------------------- |
I cannot see the textures on the object in the ObjectEditor.
--------------------------------------------------------------------------------------------------------------------------
Check that the object is pointing to the correct Jam file in the relevant GP2\GAMEJAMS subdirectory.
Check that the object is pointing to the correct image in the correct Jam file. |
|
Version 1.1
- Minor corrections and added reference to Advanced 3D Object Editing tutorial. 25/7/07.
Version 1.0
- Initial version by Ralph Smith 25/06/07.