How to .... Set Up a Formula One Car

Steve Figg


Car Set-up - one drivers methods.

In many places, I've seen various treatises on how to set up a Formula One car in GP2. Some of these are good, some are not so good, most are complicated, and all are probably written by people far more knowledgeable than I. Here though I'd like to try to produce a useful distillation of the wisdom I've acquired from others - with a few of my own ideas and interpretations thrown in to bind it all together.How important is car set-up? If you are struggling to get that perfect set-up? Consider for a moment, just how perfect can a car set-up be? Consider that two different, but skilled, drivers may be using two very different set-ups. If these two drivers swap set-ups they might neither be able to keep their cars on the track, let alone get the same driving performance!Moral; probably the most important influence on car set-up, is driving style.Rear Wing Angle, and Top Gear Size.So where should you start when creating a new set-up? I use one or other of two basic approaches. If I'm setting up for a circuit that I'm not familiar with, and if I've plenty of time, then I'll start with a very high downforce set-up, and gradually tweak it down for speed. If time is short, or if I already know the circuit, then I’ll work straight to a maximum speed set-up.Whichever approach I'm using, I also employ a couple of very simple home made graphs to help me with rear wing and top gear settings.The first graph plots speed against rear wing angle. Rear wing angle is the dominant source of aerodynamic drag in GP2, and is therefore the main limiting factor of maximum speed for any given set-up (assuming the gears are set right). Note: In GP2, adjustment of the front wing will have no effect what so ever on the maximum achievable speed - it will of course have profound effect on the car's handling, but for the moment here we're interested in top speed.My second graph plots speed against top gear size. If the wrong size of top gear is used, you won’t get the best out of your chosen wing setting. Too short a gear and you will just not have enough "legs" on the car to reach the top speed achievable – you’ll be "red lining" the engine before you reach the limit of the drag you’re carrying on the rear wing. With too long a top gear the loss is more subtle - higher gear ratios give less acceleration.
 
Both of the graphs where drawn from data taken at Hockenheim, (in a modified car with 750 bhp engine). They may not be ideal, but Hockenheim is a convenient track at which to find a long straight (that headlong charge from corner one to the first chicane).
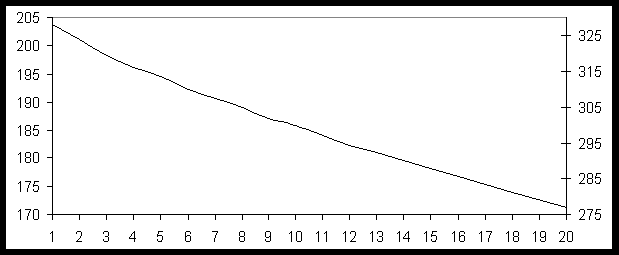
Graph 1, Speed vs Wing Angle

 
Graph 1: Rear Wing Angle vs. Speed (left axis MPH, right axis KPH)

For speed vs. wing angle; take each wing angle choice in turn. Note the maximum speed attained as you hit the gravel at the first chicane (don't worry about wrecked cars - this is research and development <s>). You may need to make trials with different gear settings, to ensure that it’s the wing that’s determining your chicane crash speed and not too small a top gear (beware though not to set too large a top gear for each test - you want to give yourself the smallest gears possible to get the best acceleration).
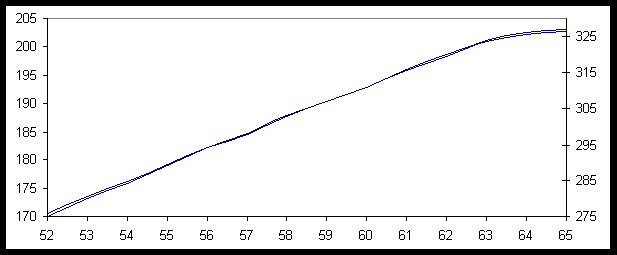
Graph 2, Speed vs Gear Size

 
Graph 2: Gear Size vs. Speed (left axis MPH, right axis KPH)

Similarly, for speed vs. gears, (with minimum rear wing); take each top gear choice in turn (with first gear around thirty and all other gears equispaced). As before, take note of the maximum speed attained for each chosen top gear available (repeat each test at least three times, to average your results).When you've collected your data, plot the graphs. Alternatively, use mine. No graph will be ideal or wholly accurate for all track conditions, but they are a very useful guide to aid quick selection of appropriate and compatible wing and gear settings.A point of interest: See how the end of the second graph tails off? This is because of the lower torque available from higher gears (weak acceleration). There comes a point when a higher gear won’t get you any more speed - not for want of gear ratio, but simply because there isn’t enough engine torque to push faster against the aerodynamic drag from the rear wing of the car.
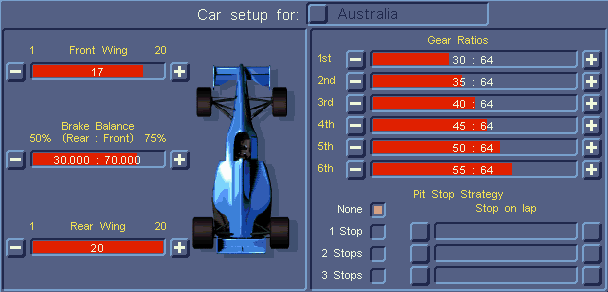
If I'm using my first approach to optimum set-up, then I start with maximum wing downforce, 20. Looking up the wing setting on graph one, gives me the maximum speed I can expect to achieve, somewhere around 172-173 mph. Then on graph two, looking up the maximum expected speed indicates what gear size to select for top gear, 53 should be about right. With this approach, I take my time, and drive several laps before even thinking of reducing the wing. Depending how I get on and how the car feels, I may take the wing down one of two notches (re-selecting the gear sizes as appropriate), then back out to drive another dozen laps before repeating the process. By this method, I give myself time to get used to the circuit.My second approach is far more businesslike. At any given circuit there will usually be a maximum speed which cannot be exceeded, but is actually less than the theoretical maximum speed that a formula one car is capable of. If a circuit consists mostly of short straights and lots of corners, there may not be a straight long enough to justify using a faster car set-up. In preparing a car for such a circuit, you need to know what the circuit’s maximum speed is. Using a minimum downforce set-up take your car to the fastest section of the track and thrash it to see what top speed you can reach. Don’t worry if you crash at the end of the section – you most likely will. The object is to find the circuits maximum speed. Once you know the circuits maximum speed, there is little point in setting your car up to go faster. Use graph one to select the appropriate wing angle for the circuits maximum speed, and graph two to set size for top gear.Front Wing.When the rear wing is set, you can look to the front wing. The front wing affects front downforce, which affects front grip, and hence grip distribution (balance) when cornering. The front wing also makes the front brakes work more effectively (bear in mind that when you’re trying to slow the car, most of the car’s braking force operates through the front of the car).When seeking to balance your car, you should remember that too little front downforce will result in the car under-steering – the car will slide off the track because you haven’t enough front grip to turn hard enough to make the corner. Conversely too much front grip can so overbalance the rear grip that the car goes into over-steer and spins off the track uncontrollably. Most drivers prefer to err more towards under-steer than over-steer.You should set your front wing so that you have enough grip to hold the track in the fastest corners, but not so much that the car spins uncontrollably and without warning should you turn sharply.Springs and things ...Now the part I’ve been dreading, writing about how the springs (and associated anti-roll bars) and dampers can be understood to operate, how to set them, and how and when to adjust them."What state is your car in?"For the purposes of discussion, and in order to understand what’s happening to your car, to know the forces at work, it’s useful to know what state it’s in. By state, I mean ... well hopefully it’ll become clearer if I just prattle on.There are two states a car can be in. Steady state, and dynamic or transitional state.Steady state is the easiest to describe. If your car is travelling in a straight line, at a steady speed (usually flat out) then this is clearly a steady state. Also, if you’re travelling in a straight line under steady acceleration (throttle wide open). Lastly if you’re travelling at constant speed around a constant radius corner, call this steady state cornering.The point a race engineer needs to remember is that in steady state conditions the weight distribution of the car is not changing, and so the dampers will have no effect on the balance of the car – only the springs, anti-roll bars, and wings can be adjusted to get the car balanced.Dynamic or transitional states are those where the weight distribution of the car is changing. Turning into a corner, or straightening out of a corner, and acceleration or braking, or combinations of changing speed whilst cornering are all dynamic states. In these conditions the weight distribution is changing and only judicial adjustment of the slow dampers should be used to affect the way the weight moves and so adjust the balance of the car during these dynamic states.You should set your car’s balance first by adjusting the wings and springs under steady state conditions, and only then adjust the slow damper settings to try to maintain balance during the transitional, dynamic state conditions.Car Balance.The aim of the perfect set-up is to get the maximum speeds possible from a car that remains well balanced on all parts of the circuit. A car is well balanced if you can keep it in that narrow region between over-steering and under-steering, without undue loss of speed, on all parts of the circuit.Steady State Cornering Balance.You need to have the car balanced first under steady state cornering conditions. Steady state cornering balance is affected by wing settings, spring settings, and the anti-roll bar settings.More front wing, or less rear wing, will tend to increase over-steer and decrease under-steer. Conversely, less front wing or more rear wing will tend to reduce over-steer and increase under-steer. You shouldn’t want to change the rear wing setting as you should have already chosen a setting to match the speed you want, but you should be aware of the affect that changing the rear wing has on balance.Harder front springs (and/or harder front anti-roll bar) or softer rear springs (and/or softer rear anti-roll bar), will tend to reduce over-steer and increase under-steer. Conversely, softer front springs (and/or softer front anti-roll bar) or harder rear springs (and/or harder rear anti-roll bar) will tend to increase over-steer and decrease under-steer.You should see from the above that it’s the ratios of settings from front to rear that actually set the car’s balance. If for instance you have very soft anti-roll bars front and rear, so much so that you can’t make the rear anti-roll bar any softer to combat over-steer, then increase the front anti-roll bar instead.Dynamic Cornering Balance.Let’s assume first that you’re happy that your car is well balanced under steady state conditions. If not, then go back and see to it - there’s little benefit in trying to damp out the unbalancing dynamic forces if the car is not balanced reasonably well under steady state conditions!Okay, now the really tricky adjustments. The dynamic balance of a car depends very much on what forces are at work, and where the weight is moving. Different transitions of weight will need different combinations of adjustments to control. Use the slow dampers to resist the transfer of weight and so try to keep the car in balance. The bump dampers resist the transfer of weight onto each spring/wheel and the rebound dampers resist the transfer of weight from each spring/wheel. This is horrible to try to get your head around, but read on and let’s hope it makes sense soon.Let’s take an example, suppose you find that your car over-steers (spins off) when you brake into a left hand bend. This is a combination of transitions so it might help to simplify the conditions. Firstly, under braking, the weight of the car will move longitudinally towards the front of the car, tending to make the rear lighter and the front heavier, making the car more likely to over-steer when you turn. Secondly, turning into a left hand bend will tend to throw the weight laterally over to the right side of the car.For this example, simplify the problem you’re working on by braking earlier so that you’ve completed your braking when you begin to turn into the corner. If the car still over-steers as you turn in, then you could consider further adjustments to the anti-roll bar ratio (harder at the front, and/or softer at the rear).Anti-roll bar adjustments are particularly appropriate if you’re having similar over-steer problems entering right hand bends as well as left hand bends. The anti-roll bar is precisely what it says it is, a spring stiffener under body roll conditions (i.e. entering or exiting corners where weight transfer is lateral - from one side of the car to the other). A stiffer front anti-roll bar (or softer rear anti-roll bar) promotes under-steer (vs. over-steer), whilst a softer front anti-roll bar (or harder rear anti-roll bar) will tend to promote over-steer (vs. under-steer).If you’re happy that the springs and the anti-roll bar ratios are as you want them, then it really is time to look at the damper settings. I’ve been trying to dissuade you from messing with the dampers, as the effects really can be quite subtle.For a left hand bend, increase right side bump dampers to resist the transfer of weight onto the right side, and/or increase left side rebound dampers to resist the weight leaving the left side. Setting the rear dampers slightly softer than the front dampers will make the rear of the car react more softly against the weight transfer, thus hopefully reducing the likelihood of over-steer. For a right hand bend, you want to control weight transferring to the left side of the car, so you need to be working on the left side bump dampers and right side rebound dampers.Now take into consideration the effects of braking. Under braking, weight will move to the front of the car. Entering a corner under braking will put more weight at the front of the car and less at the rear, this in itself can lead to over-steer. But also note that braking will exaggerate the front lateral transfer effects as you turn into the corner. So controlling weight transfer at the front will have more effect than at the rear. During braking, to resist weight transfer onto the front, increase front bump dampers, and to resist weight leaving the rear, increase rear rebound dampers.The key to understanding dampers is to realise that under dynamic conditions it’s the dampers and not the springs that govern the car’s response. You need to know which dampers are acting in any given situation, and then modify the appropriate dampers following the same general rule that applies to springs. Damper adjustment harder or softer works similarly to springs - i.e. stiffer at the front, softer at the rear for more under-steer and less over-steer, conversely softer at the front, stiffer at the rear for more over-steer and less under-steer. So simple isn’t it <s> In combination the damper interactions get far more complicated .... Remember, the general rule for adjusting damper levels is as for springs, softer at the front and stiffer at the rear encourages over-steer and combats under-steer. Softer at the rear and harder at the front encourages under-steer and combats over-steer. Fine adjustment is needed to get the balance right, but the trickiest part is being sure of which bit needs adjusting.One more overall rule of thumb regarding dampers: Generally drivers prefer to have their bump dampers set softer than their rebound dampers – this is to encourage the car to sit lower on it’s springs and closer to the road.Ride Height and PackersNow to a whole new area that I haven’t mentioned at all yet, Ride Height!Ride height, when set optimally, is a major source of aerodynamic downforce – rivalling the wing settings for it’s downforce contribution. With the front slightly closer to the road than the rear, the underside of a formula one car forms an air funnel with the ground. This causes what’s called a "venturi" effect as air passes under the car. The air passing under the front of the car, expands under the car as the funnel opens towards the rear. This leads to low air pressure under the car, which effectively leads to suction under the car helping to keep it close to the ground. This is called "ground effect" and is completely independent of the wing settings. The faster the car travels, and the lower it is to the ground, the better the effect.Beware however, not to set the car so low that the bottom of the car rubs along the ground. You’ll see the plank warning flashing in your cockpit as this happens. "Bottoming" (as this is called) has serious adverse affects. You’ll rip away the hated planks (incurring penalties), and if it happens during cornering you’ll seriously louse up your suspension performance.If your car bottoms only as you reach peak speed on a straight, then fine you can probably build it up using packers, but if it bottoms at all in a corner then you must make suitable adjustment to raise the ride height. Don’t add packers to correct suspension problems in corners, more likely you’ll be needing to remove packers if you’re having cornering problems – in corners you want the car to be on it’s springs, not on packers and certainly not on the planks!Several factors affect ride height; you could perhaps stiffen all the springs and or anti-roll bars, or you could lessen the wings, or of course you can dial in a greater ride height. You’ll probably need to view logged data from your practice laps to see where the car is too low – if it’s only rubbing at the rear then there’s no need to raise the front too (or vice-versa). Note also that ride height can be affected seriously by car weight, so at the start of a long race on full tanks, she’ll sit much lower than she will later.What are packers? Packers are shims that can be put into the spring suspension assembly to limit the travel of the suspension. The travel of the suspension is its’ allowed movement. At the end of the suspension travel (the end of its’ limit of movement) is the bump rubber. Packers are put behind the bump rubber so that the suspension hits the rubber sooner.Ideally you want the suspension set up so that you’re mid-spring in all the worst corners. Under absolutely no circumstances do you want the suspension riding the bump rubbers while you’re struggling for grip in a corner – the suspension aids cornering grip, but only if it’s allowed to function. If the springs are too soft, or the travel is too limited, you have a problem that needs adjustment.If you’re developing a car set-up from scratch, then begin with no packers and set the ride height high, on medium strength springs.Brake Balance.I’m not going to say much about this. Remember that when a car brakes, much of it’s weight will move forward, and consequently the front of the car will do most of the work under braking. The brake balance will therefore be heavily biased towards the front in most settings.If you’re not sure where your balance is, then err to front as this causes under-steer, which remember is generally preferable to over-steer. If you like "trail" braking though, and like to corner with all four wheels drifting, then notch the bias towards the rear a little to try it out.Checking the logged data from your practice laps can be particularly useful. Look for wheelspin differences under braking conditions as you apply brakes. The wheelspin should normally be a fairly good match to car speed, unless a wheel is locked (braking) in which case you’ll see a downward spike on the graph for the offending wheel. To check your brake balance, just look to see which wheels lock up first. If it’s front wheels then move the brake bias backwards – conversely if your rear wheels are locking first then adjust the bias forward onto the front brakes.For more advanced adjustments, if one wheel (front or rear) is locking earlier than it’s partner (eg left front locks before right front), try adjusting springs (and possibly dampers) to transfer more weight onto the offending wheel.A Starting Set-up.Ok, at last, here’s a set-up to get you started. This is the one I use when I’m at a new track where I’ve time to start from high downforce while I learn the circuit. Figure one, shows the standard menu page from GP2’s car set-up pit screens.
Figure 1, GP2 Standard Car Set-up Menu

Figure 1: Standard Menu

You can see this is a high downforce set-up, and according to the graphs earlier, I’ve been a couple of notches generous in my top gear selection – but it’s a nice set-up to use to start familiarising yourself with a new track. ["quite a relaxing drive actually, as it’s pretty hard to lose a car with this much downforce on a corner"]Now the advanced set-up (in figure two), though it’s settings are rather more subjective.
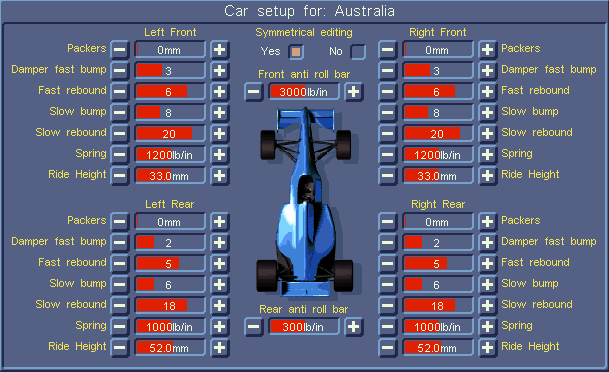
Figure 2, GP2 Advanced Car Set-up Menu

Figure 2: Advanced menu.

As mentioned before, start with no packers, and start with a high enough ride height to be well clear of bottoming. I’ve got springs and anti-roll bars set to mid range front and rear – allowing adjustment either way.The damper selections are chosen by mid-way rule of thumb. I want all dampers softer at the rear than their equivalent front dampers, and I also want bumps set softer than rebound (I want my car to hug the road and not be on tippy-toes), but I also want some adjustment left each-way on all settings.Where to now?That’s it. I can’t give much more of my own "wisdom" (for what that’s worth).From here, trim the rear wing down for speed (bearing in mind the circuit maximum – which you know how to find). Keep the gearbox set to match your speed. Correct for over-steer or under-steer – first with wings (front wing), then springs and anti-roll bars, and as you isolate particular cornering situations where you still have problems, move to dampers. Minimise ride height wherever possible – if you get plank wear, look to packing or raise height again. Recycle earlier considerations; for example, as you lower ride height you may find the gain in ground effect allows you to reduce rear wing further which will mean rechecking gearbox etc etc .... It’s a process of iterative refinement.And finally, the very best of luck to you ;-)
Steve Figg ©2000
back