
by addie walti
version 1.1
introduction to the subject
Start of the cc-line
Now the line
Editing in general
Inserting a cc-line section
End of cc-line
Special properties
Cmd112 (0x70) sectors
Tighter/wider - argument
In this document i describe how cc-lines are done and work in Grand Prix 2. Cc-line is what is called ideal line or best line in gp2 and/or real life. With cc we refer to the computer control or computer controlled cars.
CC-line editing becomes a special meaning because of mainly two reasons. At first, a cc-line is neccessary to the game. At second you still have to do it by hand.
As you may know, the cc-line (visible in the game with driving help F5 enabled) is used by the the cc-cars as guide line. They do read it ahead and determine brake point, corner speed etc. You saw this when you tried to beat them in a quick-race. The cc-line is also important to the steering help of the player. With steering help on, your car "tends" to follow the cc-line. A track with messed-up cc-line is hardly driveable for you with steering help on. (And keyboard driving is almost impossible w/o steering help). (I am keyboard driver, so i beg you on my knees: please EVER make a cc-line, as perfect as possible, so i will be able also to enjoy your track...after all thats why i write all those tutorials)
At first we have to understand how the cc-line is related to the rest of the track. Mainly the cc-line is a geometrical object on its own. It is defined by its own table of sectors. It is connected to the track at just one point, the beginning of track sector 0. Then the exact beginning of the cc-line is defined by the values of the cc-start arguments in the header of the track. In the TE (trackeditor of Paul Hoad) this header can be found in the track config section in the track tree.
Unfortunately there is no tool available for generating cc-lines so far. There were attempts to build cc-line wizards in the past, but you probably will find out that they do not give you a usable result in every case. So there is no way around making it by hand as soon as your track has more than one corner. And you also may notice sooner than expected that the cc-line does not even show up in an acurate way in the TE (please have a look at the original tracks, e.g. Adelaide f1ct16.dat, to get an idea here). Its one of the remaining mysteries of gp2 track editing, why the cc-line shows up the way it shows up in the TE.
So you will have to make the line sector by sector and checking every step in the game. You need a reliable "environment" where you can switch and switch back as easy and fast as it gets between trackeditor and game.
This document covers the basics of cc-line editing. I do not really discuss how
to make A GOOD cc-line. The discussion about that would be never-ending, so i suggest
to not start it at all :) I just say, the cc-line should "feel good" to
keyboard drivers and the cc-cars should behave as reasonable as it gets, and their
strength should be about the same as in the original tracks (but here you also can
deal with their setup).
I describe how I do it. If you follow this guide i guess you will get acceptable
results soon. Later you probably will develope your own approach to the job (and
i will be glad to learn your approaches and possibly include them here).
A few important notes at first: So here is the cc-line rule number one: do start
with cc-line-developping only when the track-layout is definitely finished. Also
the pitlane has to be fixed first, because sometimes there are changes to the track-layout
necessary also when working on the pitlane. As soon as you change a little thing
of the track layout you risk to completely mess up the cc-line.
Rule number two is of course: frequently backups (copies) of the track in a save
place (e.g. after every finished corner; believe me i know what i am talking about
here :).
When refering to a trackeditor (TE), i mean version 1.7.3 of Paul Hoad.
I hope it helps
addie
Unfortunately the ccStart-arguments are not easy to understand.
I see them as definition for the very first cc-line-sector, which leads into cc-line sector 0, c0.
They are not what they are labeled. The line seems to start always at an offset of about 4 into t0. The arguments in the TE labeled with ccStartX and ccStartXHigh are unks actually. As far as i saw, they do somehow influence the angle of the cc-line at the very beginning (see below). ccStartX=0 hangs the game when loading the track.
ccStartY shifts the starting-point sidewards. positiv values shift to the right, negative values shift to the left. The unit is probably the same as with track-width. So +1500 is about at the right border of the track. See the following image with different ccStartY:

Then we have 4 unks. The first two are not clear to me. Unk3 and unk4 describe the
angle of the cc-line at the very beginning IF startX is set to 1 and startX (high)
is set to 208.
Unk3 and unk4 describe the angle in a way similar to the radius value of the curved cc-line sectors. unk3 is the sign, unk4 the radius. If you dont know yet how radii work in cc-line sectors, you may want to check this out first.
Unk3=0 and unk4=1100 is sharp to the right, then the "wider the radius" the closer the starting angle comes to straight ahead.
Unk3=-1 and unk4=65535 is sharp to the left, then the "wider the radius" the closer the starting angle comes to straight.
But as i mentioned before, these angles at the very beginning seem to work only with startX =1 and startX(high) = 208. Other values seem to simply straighten the cc-line or make the angle much tighter.
Most of the times you may want to simply let be the original values and just adjust the startY-value for a good approach of the first corner after the s/f-line.
Basically its the same as defining the track itsself, but without the heights. You have SECTORS of the cc-line and every sector has a LENGTH and a RADIUS. Length is about the same unit as in track-sectors. We have two kind of cc-line sectors, the so called cmd80-sectors and the cmd112-sectors. The cmd80-sectors are straight or curved with constant radius. The cmd112-sectors ar curved with transition radius (like arc of ellipse).
The following image shows the cc-line editbox. It opens when you doubleclick an entry in the cc-line data table in the track tree. Here we see the box with a cmd 112 sector.

Length is not hard to understand. As its name implies its the length of the sector. The unit seems to be the same as with track sectors.
Radius is a bit tricky at the beginning. Lets leave alone the alternative
input fields in the TE. Then you have two fields RADIUS and SIGN/SCALE. Set both
values to 0 to get a straight. Set sign to 0 or greater than zero and radius greater
than 0 to get a turn to the right. Set sign to a negative value and radius to a value
1..65535 to get a turn to the left. Radius unit is very small. You may want to increase,
decrease radius-values by steps of 10000 at first, then maybe by steps of 1000 or
500 for fine-tuning.
The tightest possible turn to the right is radius=1 and sign=0. The bigger the radius-value,
the wider the corner. If you reach a radius-value of 65535 and still want to increase
(you will often want to), then the next will be: increase sign to 1 and start over
with the radius=1 (or 0), increasing.
So far so good. Now for the tricky part: the tightest turn to the left is radius=65535
and sign=-1. The SMALLER the radius-value, the wider the corner. If you reach a radius-value
of 0 and still want to decrease (you will often want to), then the next will be:
decrease sign to -2 and start over with the radius=65535, decreasing.
The remaining three fields are described later in this text. "tighter/wider". "0x70 unk".
At first you straighten the cc-line (see menu CC Line in TE) to get a bunch
of cc-line-sectors with length=1 and radius/sign=0/0. You may want to start with
a very first cc-line sector that is all straight, with a length of about the length
to the first corner of the track. The second cc-line sector with a length of say
5 and radius/sign of say 10000/0 for a corner to the right or say 55000/-1 for a
corner to the left. the rest of the cc-line sectors is still untouched (length=1;
radius/sigh 0/0)
Then you go into the game and have a look. maybe you have to increase or decrease
the length of the very first sector. Pretty sure you have to adapt the radius of
the second cc-line sector. if the corner is right, you go on to the next section,
etc.
You may want to work with a tight curve at the beginning of the remaining part, like
this:

When you go into the game now you perfectly know where you are:

The following method is suggested by Mal
Ross :
"Rather than putting a sharp corner at the end of a cc-line which is in development, I find it easier to start a new cc-line by deleting all of the original. I then just add sections as I need them. It's easy to see where the cc-line ends because it suddenly 'snaps' to the middle of the track (i.e. the default cc-line). I usually add enough 4 cc sections at a time - enough to get to the next corner and around it."
You may want to work with "save games". When your car is positioned at
the end of the finished part of the cc-line you make a "save game". After
the next changes you simply can load the game and the car is positioned again. (Maybe
even pressing ESC in the game and then choosing "Return to cockpit" does
it. But this need to be confirmed. The jams get reloaded that way, but i'm not sure
about the track itsself. I didnt made specific tests so far.)
Thats it. the hard part is, you have to switch between the game and the TE after every change, to verify it ... and the more corners there are, the more time consuming it is (but thats no surprise to anybody i guess :).
Actually chicanes or even double chicanes are the worst thing to do (i once fighted
more than 4hours with such a double chicane. But that was before i knew about the
tighter/wider value).
For adjusting the speed of the cc-cars, i prefer appropriate setting of the rear
wing in the cc-car setup. I guess for most of the tracks this works perfectly. If
the cc-cars are too fast, increase it. If they are too slow, decrease it. I prefer
to adjust their speed in order to have them about as hard to beat as in the original-tracks.
IMO you also have to avoid the line going over the kerbs, because the cc-cars do
not get irritated by the kerbs if they are just following the cc-line (as martijn
keizer mentioned), but the human driver certainly will (badly on high kerbs, as most
of us will have experienced), and this is not fair :)
This is a bit tricky in the TE. I do it this way, maybe there is an easier way. Here we go: i choose the cc-line tool in the toolbox-floater. I select the cc-line sector whereafter I want to insert the new one. I select by clicking on the appropriate line in the cc-line table window. (Clicking in the track-tree does not do it). Or you click at the sector in the track-view window. But i dont like that method very much, because you never know what else get changed, if you click in this window. Clicking into this window is free of stress only if the zoom- or the point tool is selected.
If the sector is selected (blue colored), I choose "insert new cc-line sector" in the cc-line menu.
Step by step
I assume that track view window ("Track / Track View" or "Table / Track View") is open and tools toolbar ("View / Tools Toolbar") is showing up.
- "Show / CC-Line", "Show / Info / Show CC Numbers" in track
view
- select "CC-Line"-tool in tools toolbar
- to select a cc-line sector, point and click at its beginning. If you got it, the
sector turns blue bold like in the following image.
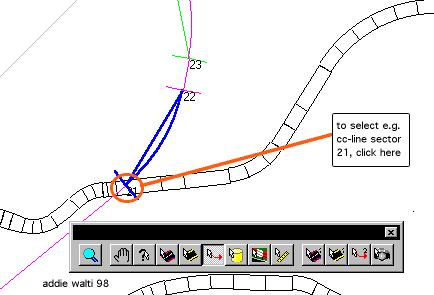
- now choose "CC Line / Insert CC Section" for inserting a cmd80 cc-sector or "CC Line / Insert CC Section (cmd 0x70)" for inserting a cmd112 cc-sector AFTER the selected cc-line sector.
- when inserting a cmd112 cc-sector you have to press the F5-key afterwards to SEE what happend.
To delete a cc-line sector do select it like mentioned above and choose "CC Line / Remove CC Section". there is no need to press F5 here to get a track view refresh.
At the end of the lap you may have noticed the cc-line is disappearing. No worry, it is not disappearing, it is just somehow covered by the starting grid. All you have to do is shifting it away (e.g. all offsets +100). Be sure to let match begin and end of the cc-line as perfect as it gets.
Final check
Quick race; watch them when they cross the attachement-point of begin and end of cc-line. It should be completely smooth.
Its probably not news but i made my tests with the cmd112 cc-line sectors and
came to the conclusion, that the two 0x70-only-unks really are the 2nd radius, as
Timmo mentioned in the forum in August last year. The regular radius arguments describe
the radius at the beginning of the sector. The radius as given by the two unks describe
the radius AT THE END of the sector (the upper field is sign and the lower field
is radius). The line between beginning and end of sector has a transition radius,
similar to a sector of an ellipse. If watching the originaltracks and imagine the
parabolas at the appropriate sectors, it becomes obvious. A very good example is
f1ct16.dat, Adelaide.
Another proove of this is to set the regular radius in a cmd112 cc-line sector
to 0 (straight) and also set the two unks to zero: you guessed it, it becomes a straight
sector. I checked that.
Last but not least: to transform a cmd112-sector to a regular cmd80 sector, just
copy the values of the regular radius to the two unks. Theoretically. Practically,
it doesnt work. The second radius seems to have to be bigger about 1000 than the
regular radius (smaller 1000 if turning to the left), else the cc-line get messed
up. Thats what i found in the few tests i did here.
Hm, later, by chance i came to the opinion it works also ! So it seems to work under certain circumstances and it seems to not work under other circustances ?! To see lots of cmd112-cc-line sectors of any kind, please have a look at the "Grauholz 99"-track, to be found in the "fictional tracks"-section at grandprix2.com.
Mal Ross reported a case where the cc-cars ACCELERATED at a decreasing radius.
The "rules" for setting sign and radius are the same as for the regular radius, although sign is represented by its unsigned figure sometimes. Remember: 65535 equals -1 here !
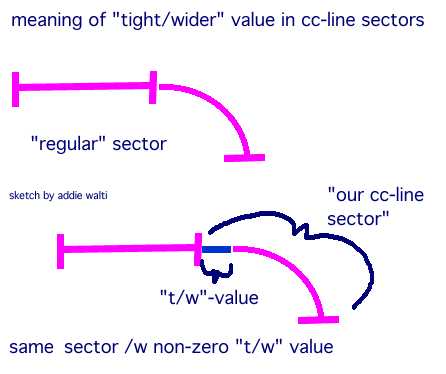
As you may know, the length unit of a cc-line sector seems to be the same as with
the track-sector, 16 feet, 4.87m. Some of you may have had problems with this big
grid when trying to develope a reasonable cc-line. So did i. I always wondered why
we have to deal with such a large unit here. The answer ? We dont have to, actually
! We can be as precise as we wish, because we have the tighter/wider - argument
in the cc-line!
Maybe we should call it offset-argument. My tests didnt allow me to come to a detailed
conclusion, but as far as i saw, values between about +/- 300 do SHIFT the COMPLETE
cc-line sector within +/- 1 length-unit ! Bigger figures start to give strange and
stranger results. In original tracks we see a range of maybe 9 to 288 as a value
of this argument. (But i checked negative values also, and they work in the expected
way.)
It works also with cmd112-sectors.
And, these two ideas also partly explain some strange things in the TE when showing
the cc-line in the track-view. The first idea becomes especially obvious in original-Adelaide.
The 2nd idea is much more subtle.
By Mal Ross: "As well as using
the wider/tighter argument, and the cmd112 command, another trick is to change the
width of the track slightly. For example, if the exit to a corner is proving difficult
to get right - the cc-line has the correct finish angle, but is almost on the grass
- just slightly increase the width of the track through the corner so that it is
slightly wider at the end. The cc-line can then be perfectly next to the edge of
the track. Of course, this may only be possible for fantasy tracks where the width
does not have to be 'realistic'. However, you don't have to change the width on both
sides of the track - just the outside."
<to be continued>
<by you?>
There is one important limit to cc-lines: the maximum number of curved cc-line-sectors. And here you have to add also the curved pit lane sectors. (The pit lane sectors seem to have kind of built-in cc-line sectors.) This maximum number seems to be around 74, as snqqpy.dog found when working on the ultima track. If you go beyond this number the track will freeze the game when loading it.
Do not just trust this or any other tutorial or the trackeditor at all. No part
of this information is confirmed by Geoff Crammond and team, so it could be wrong
also. If you find something, please notify me ...
version 1.1 (feb 99)
complete rework, first release
version 1.0 (nov 98)
starting it up
end of file