
... as far as the layout is concerned.
version 1.0
by addie walti (addie@asit.ch)
thanks to Martijn Keizer and Thomas Sturm for beta-reading and making suggestions...
I reviewed a lot of tracks lately and I saw a lot of nice and well done ones amongst them. But when having a closer look at the layout I noticed inaccuracy much more often than expected. I hope I do not sound arrogant and I hope nobody feels offended, but IMHO its really a pity if you come along a really very nice track and find out its about 1km too long/short and/or the shape of the corners is far away from reality. This is especially a pity if one knows how easy it is actually to make it correct once one knows a few tricks. So I thought its about time to write a guide how to make it accurate within the same time.
This tutorial is not meant to describe specific trackeditor-program functions, although it does anyway. My idea is to show principles. I would like to encourage people to make more accurate tracks by showing how easy it is. This tutorial is mainly focussed on trackediting for GrandPrix2 with the trackeditor of Paul Hoad. But the principles are the same for any editor for any game if they feature the mentioned functionality.
Any comments and suggestions are welcome and much appreciated.
At the beginning there is the map, the trackmap. Without a precise trackmap it is not possible to make an accurate track-layout. At first stage I always look out for the best material I can get. These days a lot of information is available from the internet. The modern tracks do feature their own homepage pretty often, most of the time including a very good trackmap.
If its an older circuit or even a no longer existing one, its more difficult of course. E.g. Bern-Bremgarten. This track does not fully exist anymore these days, but as it was on regular roads I had the chance to get a regular roadmap of scale 1:5000 of 1968, when the track still existed. The local road-work authorities are cooperative most of the time.
And the trackmaps of the following kind turned out to be very accurate (unfortunately i forgot the name of the book containing these)
but most of them can be found e.g. on <http://www.silhouet.com/motorsport/tracks/tracks.html> also. E.g. the above one is the best map i ever saw of the Bern-Bremgarten-track (although raw a bit). I verified with the regular roadmap mentioned above ...
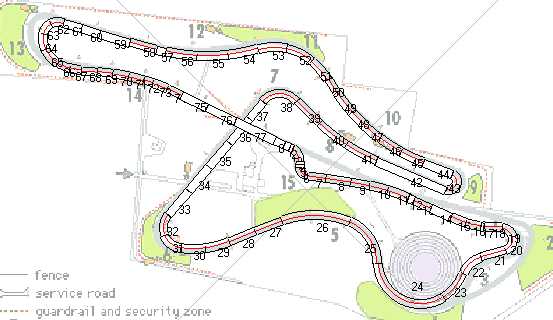
So at the beginning there is the map, e.g. the Fiorano map from the Ferrari-homepage:

Of course its difficult to judge the accuracy of such an image, but in cases like this, I tend to trust them.
In another case I was looking for a good map of the Phoenix 1989 track layout. This is about all i found:

I had some more of them but no one was really to trust. So I took them all and compared them and asked people who know the town, and made my own map including a summary of all information:

Other sources of information can be e.g. other racing games...
A good idea could be to also make notes on this map. E.g. the real track length.
You also can add info that will be important at a later stage, e.g. the position
of important buildings or flyovers or whatever.
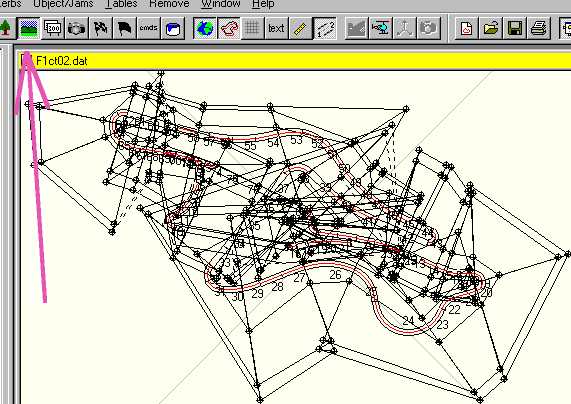
As soon as we have the perfect map we are ready for the next step: scaling it. As we already know, in the trackeditor of Paul Hoad we have the opportunity to underlay a bitmap. And we can underlay it in a way the map corresponds to the gp2-world. In the mentioned editor we load a track and call the function "show / show world extend" (pink arrows indicate alternatives). If we did so, we can see a grey square with diagonals that does show "the gp2 world extend".

By the help of the ruler-tool (green arrow) we can measure the sidelength of our
square now. We trust Paul and get: 510 track units (1.555 Miles; 2.487 km). We conclude
that our map to underlay has to be square in format and represent a side length of
2.487 km (1.555 Miles) if we can manage it to fit it in the square of the gp2-world-extend
(and we will, trust me).
So we go back to our map and try to figure out its scale. If we are lucky it already IS scaled which means you already have an indication of real length somewhere on it. Most regular maps feautre this. But the trackmaps most of the time dont, so we have to improvise and calculate. I never expect to get it right in the first approach.
Lets take again the Fiorano map as an example. This is how I do it. I print it and (after figuring out where the cars drive, which is not easy on this track) measure the layout with string and ruler, which gives me (e.g.) 54cm (0.54m). And i know my layout is 3021m in reality. The rest is elementary algebra. As soon as i know the amount of metres represented by a centimetre on the printout I am able to write the length of a straight line onto my map (btw: its basically the same with inches and feet and miles):

With most drawing-programs there is a way to find out the equivalent number of pixels of this straight line (the pink line in our image). I found its 240 in our example. Now I know, 240 pixel represent 498m, and I wonder how many pixels I need for representing the mentioned 2487m. Another stroke of algebra gives me (about) 1200. And THIS is the sidelength I need for my Fiorano-map !
With the help of my drawing-program I add margin to the track-map until it has 1200
pixel each side. This is about what I get at the end of this:

As a repetition: it is important to have it with perfectly equal sidelengths. Although its not the only way, but it makes life much easier !
Now we are ready to underlay it in the TE. But at first we have to convert it to a format that is handy in the TE. the millions of colors are working also, but 256 is markably faster. Also B/W bitmaps work, but we will be glad about some colors in the track editing daily routine :) We have our 256-bitmap and copy it to the circuits-directory where we intend to develop the track. Then we start up the TE and load some track and open the track view window.
We go to the track tree, to the section "Misc Config". There we set X and Y to the value 21 to get the upper left corner of your image into the upper left corner of the gp2-world-extend. And we set the width and height to 510. So our bitmap exactly fills the gp2-world-extend as given by the TE.


If our image has a square format, it doesnt matter whether "Edit / Maintain
Underlay Aspect Ratio" is checked or unchecked. But if the image is not square-format
and the mentioned property is checked, the underlay will NOT show up ...
So make it square. Both sidelength are preferably of the exactly equal pixel number. The size does not really matter. 1000 x 1000 or 2000 x 2000 work fine. Of course there are some upper limits for the size that may crash the TE, but in general you are free. The more you have, the more precise is the map, but the less you have, the faster the TE works. You have to find your way.
Of course it is also possible to make a smaller map, without adding that much margin, and set appropriate values in the misc-config section. but there you need different calculations, that i'm too lazy to figure out and describe right now. If you got it the way i described above, i guess its easy for you to also figure out the other way. The reward will probably be a faster working TE.
However.
Now we choose a track as our base. I suggest to always start with an original track. As there are still unknowns in track editing you never know what bugs got included in a custom track :) Basically you may choose whatever track meets your new track best, but on the other hand it doesnt matter that much, because most of the things can be transfered from one track to another nowadays. My choice is (most of the times) the Circuit Gilles Villeneuve, f1ct06.dat, because it includes the "shadow"-object AND it includes pretty few objects in general, so there is much room left for custom objects. The disadvantage is the pit building that "disappears" as soon as you leave the pit place. But you can replace it by another building anytime, so this is not that bad.
However i consider the choice not anymore as that important (except if you intend to insert lots of custom objects). So we take the Circuit Gilles Villeneuve and underlay the Fiorano-Map. I already choose the slot I want to use for the new track. I compare the length of the new track with the length of the original tracks and i choose the best match. So the track is easier to integrate in a regular gp2 installation.
In our example i choose slot 2. Not really a good choice, but the best i can get.

As a next step I do shift the starting point of the track to the "s/f-line"
of Fiorano. I also do rotate the track so the very first tracksector shows in the
right direction. To get a better view to the beginning of t0 (tracksector 0) I change
the "angle of some track sector in order to "bend away" the rest of
the track. After a few minutes we have something like this:

IMPORTANT: You also may want to quick&dirty "fold" the track right
now to have it fully within the gp2-world-extend, because the TE tries to fit your
track within the gp2-world-extend when loading it the next time, by eventually shifting
it away from the track-map again !!
So here is my "Circuit Gilles Villeneuve" in its first transition stage to the Fiorano track:

For having a better view to the track , it could be a good idea to dim the trackmap
! I also did that in the meantime. So the image with the s/f-line now looks like
this:

Dimming is e.g. done in the drawing-program by changing brightness/contrast settings
...
Now in a first approach I lay out the track, quick and dirty. Some remarks: I'd suggest
to "save-as" after about every tenth tracksector. I also make backup copies
f1ct02xx.dat from time to time. If you have the track view magnyfied like in the
image above you may have to scroll a lot. You may notice, scrolling-speed depends
on the size of the track-view window.
I want to keep all original tracksectors at this stage. So i take care a bit on allocating the new length-values to the track sectors.
About an hour later, we have this (see f1ct0207.dat included with this tutorial):

As we can see in the "Track Statistics" our track has a length of (594-1)
x 4.877m, which gives 2892m. As we all know, since 1992 the layout of the Fiorano
track, as choosen here, has a length of 3021m, so we are 133m too short. 133 is about
4.3% of 3021, so we reduce the sidelength of our bitmap by 4.3%, to actually get
a magnyfication by 4.3%. (If you got this, you got it all!)
Now we have 1147 pixel sidelength (see fio_scl.bmp included in this package).
After the reduction, and a new loading of the track with the TE, we see, the underlay is a little bit larger than before:
So we have to reshape the whole track.
After another say 20 minutes we have it done and it looks like this:

As we see in the "Track Statistics" we have 3023.6m (3018.7m actually) which is the best approach we can get, and we are happy ! Trackshape and length are already about as good as it gets and all in all we used about 3-4 hours so far. Sometimes we need another turnaround, or even two. This may become especially neccessary if your work with scenery and objects also does rely on the track map. If the trackmap includes the track layout only, you wont need to rescale the underlay anymore, just a little bit of imagination and improvisation and its done ...
Just to be sure you got me right: the only thing i did so far to the original "Circuit Gilles Villeneuve" was shifting and rotating the track beginning and changing length and "angle" of the tracksectors. Thats all ! (see f1ct020a.dat included with this tutorial)
As a next step we want to make the track loadable and playable in the game. Of course we could give it a try right away, but most of the time we will have to face nasty surprises. So we want to do the following things at first:
- flaten the track. All heights set to 0. Here we call the function: "Track / Remove all track heights", same to pit lane heights. We will come back to the height later again.
- remove the cc-line. We will do it from the scratch later. Up to then we use the "substitute" cc-line for "sight-seeing" the track. We call the function "CC-Line / Remove CC-Line".
- and the biggest part of work: make a working pit lane. It does not have to be perfect, it just has to work.And there are not many things you have to take care then.
As you may have guessed already, Fiorano is special with the pit lane, because there is NO pit lane. There is only kind of gas-station about where our t0 begins. But we HAVE to have a pitlane. So, as a compromise, we take the "Viale Dino Ferrari" as our pit lane parking space and do connect it to the track. The "gas-station" we will simply include in the regular track later.

In the ancient time, pit lane editing was a mystery. Thats why a lot of tracks these days are based on the original Estoril-track f1ct13.dat. Estoril has a nice straight pit lane entry and exit (the pitlane of Monza is straighter!) and is causing not much troubles as long as your pit lane is nice and straight also. But since "The Guide to Pit Lane Editing" is published, we are free. We simply choose our base-track and adapt its pit lane to our needs. Off course there are restrictions, but these are general restrictions in pit lane editing or restrictions that depend on the used slot. But there are no restrictions that depend on the choice of base-track.
Our restrictions we have to consider:
- It HAS to have a working pit lane
- The entry has to be before the s/f line and the exit has to be after the s/f line. In other words: if you follow the sequence of track sectors starting at t0, first you come along the pit lane exit somewhere in the near of the s/f lane most of the time. Then at about the end of the lap you come along the pit lane entry ...
- The pit lane has to have a minimum length of 48 units for pitting, plus some space before and after, plus the lead-in and lead-out on the track. If we dont count the latter we may say we have a minimum pit lane length of maybe 55 units (about 270m). Take a look at the Bern-Bremgarten track for the shortest pit lane i know so far ...

- The beginning of the "pit lane world" (thats the pit lane sector where the cmd 0x9f is included) has to have a certain distance from the s/f line, depending on the used slot f1ctxx.dat. This minimum distance is somewhere between 5 and 10 units. If you are too close you will have a piece of "nomansland" on the track between pit lane entry and s/f line. In the example of the Bern-Bremgarten track this one is critical as you may see in the image above.
- The heights in a pit lane are not very easy to imagine and to implement. So be prepared for having to invest a few extra hours for a pit lane like e.g. Interlagos. But nevertheless, go ahead !
- The amount of curved pit lane sectors is together with the amount of curved cc-line sectors limited to a number of about 70 ...
But we are free ...
- ... to choose the pit lane side any time !
- ...to choose the position of entry and exit of the pit lane !
- ... and to choose the shape of the pit lane of course, even heights.
Additional note:
Maybe we are even free to have the entry on one side and the exit on the other side (and somewhere inbetween a tunnel or a bridge to cross the track). But this is yet jungle area. If you are intersested in this, you may want to study the pit side switch flags in "The Guide to Pit lane Editing" to get a start. These are two flags, and it seems that one of them is for the entrance and the parking side and the other one is for the exit side...
However in our example of Fiorano we have to switch the side and to move entry and
exit. First we make the switch. As mentioned above the pit lane side is given by
a few bits in the track config section.

If we doubleclick the "PitLane Side" entry there we get a dialogbox where
we can enter a number. Most of the time the idea "Left=7562/Right=7552"
applies, but it is not correct anyway. The number corresponds to more than just the
pitlane side, so watch out. More correct is the idea (as can be read in "The
Guide To Pit Lane Editing"): "if you have a right side pit lane and want
a left side pit lane do ADD 10. if you have a left side pit lane and want a right
side pit lane do SUBSTRACT 10." The mentioned "10" represents the
mentioend two bits (8 and 2). The details can be read in the mentioned tutorial.
After the changing of this figure, we also have to do some changes in track and pit lane. In the track we have to swap the position of the cmds 0xa1 and 0xa2 at the pit lane entry. and we have to swap the positon of the cmds 0xa3 and 0xa4 at the pit lane exit. And we have to make the cosmetic changes like swapping the vergewidths in the pit lane parking space and swapping sides of markings, pit staff, building etc. everything is describet in "The Guide To Pit Lane Editing". Maybe it sounds big deal, but actually its done in half an hour.
We also want to position the pit lane entry and exit. Position the pit lane entry means position the track cmds 0x86, 0xa1 and 0xa2 and the pit lane cmd 0x9f. Position the pit lane exit means position the track cmds 0x87, 0xa3 and 0xa4 and the pit lane cmd 0xa0. Along with positioning the pit lane cmds 0x9f and 0xa0 you also have to take care on "removing pit lane fences", checking or unchecking the pit lane flags, shaping the pit lane layout and last but not least the setting of the pit lane cmds 0x9b at the entry and 0x9e at the exit. Especially the latter can cause bad troubles to your track if its arguments feature to great values. See cmd-library for the details.
Btw: moving track or pit lane cmds is very easy by simply "cut and paste" them with CTRL-X and CTRL-V (well done, Paul!).
Now the pit lane in particular and the track in general should basically work. Later, for also have it "nice" in the pit lane, you may want to have a look at the vergewidths of the pit lane and the track where the pit lane divides and joins.
Again to be sure you got me right: all i did to the "Circuit Gilles Villeneuve"
in the this step was: removing all heights of track and pit lane, removing cc-line,
pit side switch, moving some track and pit lane cmds. quick&dirty reshaping the
pit lane and doing some adjustments of vergewidths, mainly in the pit lane. (see
f1ct020c.dat included in this tutorial)
After the chapter "Make It Work" the track worked, but when sight-seeing it, I had to face quite a mess. Now i want to fix this basically. At this stage i dont need the underlay, so i "remove" it again to speed up the TE operation. BEWARE be sure to make a safe backup BEFORE using the wizard functions in the TE and check your track frequently in the game whether it still loads and works. I mean it !
This is what I do now:
- "Remove / Remove All Roadsigns". dont let you fool by individual road sign objects that may be still there. We only removed the "automatic road signs" that can be selected in the single track- and/or pit lane sectors.
- "Remove / Remove All Kerbs / Wall Removes"
We probably also see a lot of objects flying in the air. We can simply remove them by removing the appropriate cmds 0x80 in the appropriate track sectors. In my example i will do this later because this operation really depends on your individual track. If there is no tree in your track you could remove them all right now. If there are trees in your track, you may want to keep them in this stage, for having a good choice later, etc.
But we also eventually have to face things like this:

These are scenery problems. But after having had a look at the explanations of the track cmds 0xb8 and 0xaf in the scenery tutorial of Martijn Keizer and/or in the Command Library we know perfectly whats going on and we are able to fix it quickly most of the time. We can go to the TE and call "Show / Show Scenery" or push the appropriate button in the appropriate toolbar:
Hm, this is not always a good idea. In our example we just get scared :)
But after all its not much of a surprise if we look at the layout of the Fiorano-track.
So sometimes it could turn out to be a good idea to "Remove / Zero Scenery". In our example all "problems" were fixed except the upper left of the four in the image above. This "problem" turned out to be an object.
However, how to proceed with the scenery is described in the scenery tutorial of Martijn Keizer. How to deal with objects is described in the objects-tutorial of John Verheijen. And also the Command-Library features a lot of information on these subjects, mainly at the cmds 0x80, 0xb8 and 0xaf.
The 2nd part of the track layout accurancy are the heights. This is a completely different subject and most of the time its big problem to get the right information together.You have to have two kind of height information. General height information, given by about 10-20 altitude values of the real track, and the micro-heights, the slight bumps and dips and whatever stuff is around. For getting the latter you have to carefully watch video-recordings or to walk the track or to improvise ...
However you may want to work with the Track-Data-Table where we have all the neccessary information about the track. Most of all we need the columns "Cumlative Gradient" and "Cumlative Altitude". They give us the appropriate values at the end of each track sector. For getting an idea of the units you may want to have a look at some original tracks, e.g. Monaco f1ct04.dat or Spa f1ct11.dat. As for the altitude the calculation is guessed to be about 60 units per meter (or 40 units per meter if you want to point out the altitude differences)

Two things are to take care of. At the end both "cumlative"-values have to be about 0 again. In the track config section in the track tree we have a value "Track Start Height (Delta)", this value most of the time also has to be zero. This value seems to be a "cumlative gradient" at the beginning of t0, but with a different unit than ours. If you want to study this subject, you could make a good start with the original Suzuka-track ...
You may want to read the appropriate chapter of "The Guide To Track Editing" of the same author also. There the "Heights"-subject is also described in different words.
The Fiorano Heights
In our example track, the only information I have is about the section between turn 6 and 7. This section elevates for crossing the "Viale Dino Ferrari" (our pit lane) then goes down a bit, then up again to cross the track ("s/f" straight) then goes down again to turn 7.Unfortunately I dont have the information, where exactly the gradient changes are. But we can fix this later without much work, so we are not really sad about this now.
I will care about the heights later (but i will!).
Up to now I was always talking of quick and dirty shaping etc. Of course thats only
acceptable at the beginning :)
As soon as we have layout and length of the track and the ideas about the heights, we go again and reshape the track to match the trackmap PERFECTLY this time, but WITHOUT adding or subtracting track length ! At this stage we also do divide track sectors into smaller pieces as far as neccessary. It IS neccessary if we have great "angles" and/or great "height"-values.
If we had another look at our Fiorano track, we notice the tracksectors in turn 4 and 9 (t24 and t43) for example:

Of course these sectors are working in the game, but they may not look that good, at least not in the (tv-) camera-view. We will probably have to face "warpings" when driving by. A corner like turn 9 (t43) IMO has to be divided into pieces of a length of 2 at maximum. A turn like number 4 (t24) I would suggest pieces of a length of maybe 5 at maximum.
Dividing tracksectors is very easy, even if the cc-line is already done. Please have a look at the next image:

At first you select the track-tool (1), then you select (in the track-tree) the sector you want to divide (2), then you call "Track / Insert Track Section" to get a brand new straight track sector of length 20 right after t43. Press F5 to let the track-tree know of this also. Now the important part. You have to divide the length of t43, but you have to COPY/PASTE the "angle" and the height values of t43 to the new t44. Note: if you have worked on the layout right before that, you may want to "save-as" and close and reload the track first before doing divide-operations, because the "angle" values may change a little (insert an angle 0.2, save, close and load and have a look at it again to get the idea).
You also may want to make a safe backup before dividing track sectors ...
So if we e.g. have a tracksector t17 with length 10, angle 23.4999976 and height 32, we divide it in five sectors t17, t18, t19, t20 and t21 with length 2, angle 23.4999976 [sic; no tipo!] and height 32 [sic; no tipo!] each. If we do it like this, the eventual cc-line wont get messed up. (And if it does anyway, we are glad to have made a backup before :)
There is no known upper limit for the number of track sectors. As you can see in the Bern-Grauholz 1999 track it is even possible to go beyond 256 track sectors. If you say now, the Bern-Grauholz is an exaggeration, I agree of course :) but at least we have a working example of what is possible (and that was the main idea of mine when I made it that way).
Thats it for now. I hope i could show some ideas that may make a track editors life
easier AND bring us more accurate tracks in the future.
How i proceed (not completed)
1. i go through all track sectors and remove a lot of track commands.
- 0x80 object placings. As i will place my own objects at my own positions later.
-View Distance commands 0x81, 0x82, 0xbe, 0xbf. As i will adjust the view distances later as neccessary.
- cmds 0x94, 0x95, as is not really known what they mean anyway so far ...
- cmds 0x91, 0x92, 0xab, 0xc2, 0xc7, 0xd0, because their meaning is unknown also so far ...
Adjustments (not completed)
- track markings; grid, pit entry and exit (lead in and lead out)
- view distances
- 0xa8 flag men
And then there will start the big part of the work, the setting up of the correct
scenery, shaping and placing of the objects, making the appropriate textures ...
and the cc-line of course.