I am going to use this Suzuka "Marshall" Oject.

Here I describe step by step how a 3D Object in a Gp2 track can be built into another track.
One can use different steps to perform this, but I will not describe them here.
I hope that I have explained it so you understand the whole process.
Find the Object
Export the Object and collect necessary information
Preparations for Importing
Import the Object
Merge the Textures
Problem Solutions
Revisions
| As the first step one should naturally know which Object is to be copied. I am going to use this Suzuka "Marshall" Oject. |
 |
| Open the track DAT file (in the this case f1ct15.dat) with Paul Hoad's Track Editor. |
 |
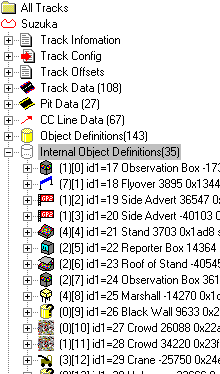
| In the left window select and expand the "Internal Object Definitions".
The Objects used in this track are displayed. The Icons |
 |
||||
| ---------------------------------------------------------------------------------------------------------------------------- | --------------------------------------------------------------------------------------------------------------------------- | ||||
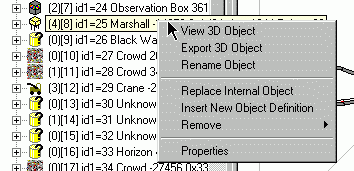
| You can confirm that you are using the correct Object by viewing the 3D Object.
Select the required Object and then right click. Select "View 3D Object". |
 |
||||
| --------------------------------------------------------------------------------------------------------------------------- | --------------------------------------------------------------------------------------------------------------------------- | ||||
The Object appears in the right window.
|
 |
| Select the required Object and then right click.
Select "Export 3D Object" and then save the Object where desired. I used the name "Beispiel.gpo". The Object "Beispiel.gpo" can now be worked on in Paul Hoad's ObjectEditor. More on this later. |
 |
| ---------------------------------------------------------------------------------------------------------------------------- | ---------------------------------------------------------------------------------------------------------------------------- |
| The usage of each texture on the Object needs to be known.
Select the required Object and then right click. Select "Properties". The Objects "Properties" will only be displayed if the 3D Object is displayed in the right window! |
 |
| ---------------------------------------------------------------------------------------------------------------------------- | ---------------------------------------------------------------------------------------------------------------------------- |
| The "Internal Object Properties" window opens.
Record the "v" number, the "Txt" number and the JAM file locations, for each entry. - Txt 31, Txt 46 etc. means that the textures with these
|
 |
| ---------------------------------------------------------------------------------------------------------------------------- | ---------------------------------------------------------------------------------------------------------------------------- |
| The "Object Definition" also needs to be known.
Click the + beside the Object, to expand the attributes.
|
 |
| Note the attribute values bordered in red.
These values specify the positioning of the Object and can be changed later. In new tracks however I always use the original values as a starting point. |
 |
| Applying Textures
As described above, the Jam Id's and paths to the textures are now needed. In this example the textures are:
Open "Suz_tex.jam" in the "Jam editor" and remove all textures that are not needed. (Right clicking DELETE)
|
 |
| ---------------------------------------------------------------------------------------------------------------------------- | ---------------------------------------------------------------------------------------------------------------------------- |
| From the menu select "File / Save As" and save the JAM files in a new directory. Do not select "File / Save" as this will damage the Suzuka JAM file. In this example I stored it as Gamejams\example\Bsp1.jam and Bsp2.jam. |
  |
| ---------------------------------------------------------------------------------------------------------------------------- | ---------------------------------------------------------------------------------------------------------------------------- |
| To save space, users familiar with the JamEditor can push the textures together in one Jam file. Like so: |
 |
| ---------------------------------------------------------------------------------------------------------------------------- | ---------------------------------------------------------------------------------------------------------------------------- |
| Determine whether Id's in the new track are free
I would like to insert the Object into the original Silverstone track. (f1ct08.dat) Open the track DAT file in the Track Editor. From the menu select "Help / Jam Index". Compare the Jam Id's with those noted earlier. In this example there are many free Id's, but there is already a texture with the number 31. |
 |
| ---------------------------------------------------------------------------------------------------------------------------- | ---------------------------------------------------------------------------------------------------------------------------- |
| Assign a new ID to a texture | |
| Find a free ID in the "Unused ID's" drop down menu. In this example I selected the ID10.
Don't do anything here, just note the ID. |
|
| ---------------------------------------------------------------------------------------------------------------------------- | ---------------------------------------------------------------------------------------------------------------------------- |
| From the menu select "Help / Jam Id's Unusable"
Make sure your newly selected ID is not in this list. |
 |
| ---------------------------------------------------------------------------------------------------------------------------- | ---------------------------------------------------------------------------------------------------------------------------- |
| Open your Object "Beispiel.gpo" in Paul Hoad's ObjectEditor. |
 |
| ---------------------------------------------------------------------------------------------------------------------------- | ---------------------------------------------------------------------------------------------------------------------------- |
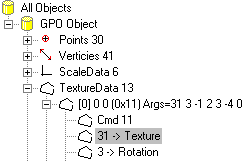
| Find all "31 -> Texture" entries in the left window under "TextureData".
In this Object there are three of them. |
 |
| ---------------------------------------------------------------------------------------------------------------------------- | ---------------------------------------------------------------------------------------------------------------------------- |
| Double click on each "31 -> Texture" line.
Enter a new ID in this window. I used the 10 which I found and selected previously. Make this change to all three "31 -> Texture" entries. Save the Object. |
 |
| ---------------------------------------------------------------------------------------------------------------------------- | ---------------------------------------------------------------------------------------------------------------------------- |
| Open the new "bsp2.jam", that still contains the texture 31, with the JamEditor. Expand the tree in the left window so that the Texture ID labels are displayed. Select the texture to be changed. The selected texture image will now be highlighted with a red border. Doubleclick the Texture ID: 31 image, with the red border. |
 |
| ---------------------------------------------------------------------------------------------------------------------------- | ---------------------------------------------------------------------------------------------------------------------------- |
| Enter the new ID in the "Texture ID" field. I gave it the 10 which I selected previously. Save bsp2.jam. |
 |
| Open the track DAT file, into which the Object is to be inserted, with the Track Editor. |
 |
| ---------------------------------------------------------------------------------------------------------------------------- | ---------------------------------------------------------------------------------------------------------------------------- |
| From the menu select "Object/Jams" "Insert New Internal Object" |
 |
| ---------------------------------------------------------------------------------------------------------------------------- | ---------------------------------------------------------------------------------------------------------------------------- |
| Select the required Object file. "Beispiel.gpo" in this example.
Click "Open" Press the F5 key to refresh the left window |
 |
| ---------------------------------------------------------------------------------------------------------------------------- | ---------------------------------------------------------------------------------------------------------------------------- |
| Expand the "Internal Object Definitions" in the left window |
 |
| ---------------------------------------------------------------------------------------------------------------------------- | ---------------------------------------------------------------------------------------------------------------------------- |
| The new object will appear as the last one in the list and will be called an "Unknown Object". |
|
| ---------------------------------------------------------------------------------------------------------------------------- | ---------------------------------------------------------------------------------------------------------------------------- |
| Rename the new object to something more useful.
Select the required Object and then right click. Select "Rename Object". |
 |
| ---------------------------------------------------------------------------------------------------------------------------- | ---------------------------------------------------------------------------------------------------------------------------- |
| Enter a new name into the "Object Name" field. |
 |
| ---------------------------------------------------------------------------------------------------------------------------- | ---------------------------------------------------------------------------------------------------------------------------- |
|
If you include a name that is in the list, the icon that is associated with that object will now be associated with your new object. e.g. "New Marshall" will get the Marshall icon. "My Stand" will get the Stand icon. |
|
| ---------------------------------------------------------------------------------------------------------------------------- | ---------------------------------------------------------------------------------------------------------------------------- |
| It can be checked now with "View 3D Object".
(The textures will be missing. More on this later.) |
 |
| ---------------------------------------------------------------------------------------------------------------------------- | ---------------------------------------------------------------------------------------------------------------------------- |
| The Object now needs to be defined.
From the menu select "Object/Jams" "Insert New Object Definition" |
 |
| ---------------------------------------------------------------------------------------------------------------------------- | ---------------------------------------------------------------------------------------------------------------------------- |
Select the last Object in the "Object Selection" "Id1" field within the green bordered area. Enter the attribute values, that were noted earlier, into the red bordered fields.Click OK Press the F5 key to refresh the left window. |
 |
| ---------------------------------------------------------------------------------------------------------------------------- | ---------------------------------------------------------------------------------------------------------------------------- |
| Expand the "Object Definitions" list. |
 |
| ---------------------------------------------------------------------------------------------------------------------------- | ---------------------------------------------------------------------------------------------------------------------------- |
| The new Object will appear as the last Object in the "Object Definitions" list. |
 |
| Expand "Jam Files" in the left window;
|
 |
| ---------------------------------------------------------------------------------------------------------------------------- | ---------------------------------------------------------------------------------------------------------------------------- |
| Select any one of the displayed Jam Files.
Right click the selected Jam File. Select "Insert Jam File". |
 |
| ---------------------------------------------------------------------------------------------------------------------------- | ---------------------------------------------------------------------------------------------------------------------------- |
| Navigate to the desired Jam file "bsp1.jam".
Click "Open". Confirm "Setting Jam file to bsp1.jam", by clicking "Yes" and Now do the same with "bsp2.jam". |
 |
| ---------------------------------------------------------------------------------------------------------------------------- | ---------------------------------------------------------------------------------------------------------------------------- |
| Our Jam files now occupy the last two positions under "Jam Files". |
 |
| ---------------------------------------------------------------------------------------------------------------------------- | ---------------------------------------------------------------------------------------------------------------------------- |
| They can be viewed also as a check. |
 |
| ---------------------------------------------------------------------------------------------------------------------------- | ---------------------------------------------------------------------------------------------------------------------------- |
| Save the track.
Close the Track Editor |
|
| ---------------------------------------------------------------------------------------------------------------------------- | ---------------------------------------------------------------------------------------------------------------------------- |
| Open the track again in the Track Editor.
Under "Internal Object Definitions" you can look at the finished Object ("View 3D Object"). |
 |
| ---------------------------------------------------------------------------------------------------------------------------- | ---------------------------------------------------------------------------------------------------------------------------- |
| Have fun with the newly inserted Object |
 |
| I know the finished Object is included in the track file. Textures appear in the 3D view in the Track Editor. If I go for a test drive on the track, I do not see the Object. -------------------------------------------------------------------------------------------------------------------------- Try it with other values for "Position & Orientation". In particular 3D Objects that are not provided with textures on all sides may make themselves invisible, if for example the value "AngleX" is wrong. |
 |
| ---------------------------------------------------------------------------------------------------------------------------- | ---------------------------------------------------------------------------------------------------------------------------- |
| After I the insert the Object and textures into the track, GP2 fails to play while loading the track. ---------------------------------------------------------------------------------------------------------------------------- Examine the "Jam Total Size" in the Track Editor. The limit lies around about 80000. Reduce, with the JamEditor, the size of the Jams. |

|
Version 1.1
- Translated into English by Ralph Smith 1/06/07.
- Added section on renaming objects.
Version 1
- Initial version by Andreas Schulz 04.01.02